
Wheelchair & Ambulatory Track Tips:
This section will publish information from our community to help others. Write an e-mail to info@ATFUSA.org or provide other material to any ATFUSA Board member and we will post it in this section. (We reserve the right to edit or not publish info. which we feel is not appropriate for the Athletics community.)
Many Thanks to the Challenged Athlete Foundation and US Paralympics for developing some of this material.
Top
- Wheelchair Racing
- Racing Chair:
-
Equipment - CAF Video
- Note 1A: The average tire pressure for a racing
wheelchair should be 110LB for the front tire and
120LB for a 24" rear tire & 135LB for a 27" rear tire. higher grade competition tires can be filled to higher pressures. - Note 1B: If it is hot day competing at higher pressures may cause the tire to burst as the tire gets hotter do not over inflate the tires.
- Note 2: The typical High school age athlete rear wheel size is 27". Shorter stature athletes may need to compete in a chair with 26" rear wheels.
- Note 3: The push rim size varies also from athlete to athlete. It is important for the athlete to be able to reach the bottom of the push rim. This may mean a smaller size push rim. (see Push videos below for a better understanding).
- Note 1A: The average tire pressure for a racing
wheelchair should be 110LB for the front tire and
- Racing Chair - Spare Parts & other items
- Compensator, What is it & how do you set it quickly?
- Push Rims
-
Transferring and Seating position - CAF Video
- Note 0: ALWAYS HAVE THE ATHLETE PUT ON THEIR HELMET BEFORE GETTING INTO THE CHAIR.
- Note 1: There are 2 seating positions feet under and feet down. If the Athlete can kneel without pain- kneeling is the preferred position.
- Note 2: The video shows transferring from the side. Sometimes this is not possible and transferring from the rear is better (typically for athletes with less mobility). To transfer from the rear of the chair one aid holds the front of the chair up in the air (which lowers the back of the seat) and a 2nd positions themselves behind the wheelchair. The athlete puts their feet over the back of the seat and slips forward into the seat. When in the seat aid 1 lowers the front of the chair to the ground. Typically these athletes race in the seated vs. kneeing position.
-
Equipment - CAF Video
- Racing Chair:
- Racing Gloves -What type is correct for you???
- The Racing Wheelchair Push
- ATFUSA Track Clinic Ambulatory and Wheelchair
- General coaching tips:
- CAF - Video
- Adaptive Sports Iowa -Video
- High School
- Competition - Wheelchair athletes, with practice will be able to stay in their lane and should not be given any exceptions to lane rules. Their wheels are their legs and if, in in-lane races, the rear wheels in a turn touch the inside lane line they should be subject to your State lane DQ rules.
- Training - Wheelchair athletes will perform well over all Track and Cross Country Distances. Although they may perform better in competition as a sprinter, middle distance or distance athlete you should train them as a middle distance athletes. In this group they should be able, over time, to do the exact workouts as all able bodied athletes.
- 800m, 1600M or 3200M start - Wheelchair athletes can run
successfully with the able bodied runners (scored
separately). For the start place them in the
outer most position on the curve. The able bodied
runners are faster at the start and will clear allowing the
Wheelchair(s) to move in successfully. Instruct your
wheelchair athletes to announce that they are passing the
able body athletes.
- Ambulatory coaching:
- Ambulatory runners are ambulatory runners some training mods are needs per below but these athletes should practice and do the same workouts as your traditional athletes. Do not treat them differently.
-
The Racing Wheelchair PUSH -
Racing wheelchairs must be pushed with the athletes hands. The Athlete uses their hands and pushes against Aluminum Push Rims that are attached to each rear wheel of the racing chair. The aluminum push rim is coated with a rubber tire glued to it. The technique is to not grab the push rim but push against it. Grabbing will slow the wheel down. Think of a person spinning a pin wheel. hit and hit with each hit making the pin wheel go faster and faster.
The stroke is well defined and is described with 5 phases:
- Catch, The athlete Catches & pushes into and downward
on the the rim at about 1 o'clock.
- Drive, Drive the hands in and down to about 5 o'clock
- Hammer, The hand acts like a hammer and pushes from
5 to 6 and possibly to 7 o'clock
- Lift & Stretch. lift the arms away straight up with high elbows to
recover. Feel the pinch at the back of the head.
- Accelerate, use speed to drive the hands to the Catch.
- REPEAT U-TUBE VIDEO 1 CAF U-Tube Basic Push
-
The Gloves -
Glove must be used for the Push.
There are 3 types of gloves.
1. Taped Baseball Gloves: For the beginner you can use
These are great for the beginner who is not yet totally committed
and needs to learn to push
To make the gloves purchase:
- a pair of baseball gloves (Left and Right),
- a pair of Dr, Sholes shoe liners
- 2 rolls of athletic tape.
First: Cut the Dr. Sholes pads into strips about the width of the
index and middle fingers of the athlete and wrap the strip over
the 2 fingers.
Second: Tape the pad in place with the tape.
Third: Do the same for the thumbs.
Fourth: Then tape the other fingers together and the palm and back
of the hand.
When done the athlete should be able to make a fist and push the
rim where the thumb and index fingers come together.
SEE VIDEO
2. SUADE/Rubber Gloves: Purchased for approximately 150.00
per pair. these are made of rubber or suede. Suede gloves are
lighter but most chose the rubber. they can be purchased from
Harness, SportAid or Eagle.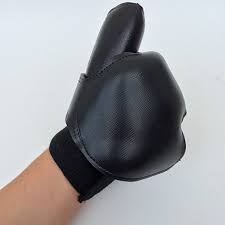
3. Molded Plastic/Rubber: The third type are made from Brace plastic
and sheet rubber. An
instruction video is available on U-tube.
https://www.youtube.com/watch?v=blUGUo3PAvI
This type of glove is now being formed in 3D printers. The first
commercial supplier is coming online at
http://www.ingeniummanufacturing.com
-
Push Rim Conditioning -
Push Rims must be replaced when they become slippery. You can spray sticky spray on them or use pine tar but they must be replaced as quickly as possible for top performance. -
You can purchase new push rims from the Chair manufacturer or you can rip off the old rubber coating and take an old tire and glue that on with contact cement.
-
When you replace push rims (purchased or glued) they must be conditioned to make them non-slippery. You can rough-up the tire covered push rims with a wood or metal file or use a propane torch. (torch instructions - While holding the torch 2 to 3 inches from the rim slowly go around 2 or 3 times for about 10 to 15 seconds until the top coating of the tire is just softened. The rim is done when the tire is beginning to become tacky and a little black is transferred to your figure. The push rims will wear out quicker with this method but the rims will be ready to go immediately).
-
Racing Chair Spare Parts Kit -
You must be prepared to compete. Besides having the correct equipment and practice, practice, practice, each athlete must have a set of replacement parts and keep them with you in case of failure. The kit should contain:
- a gym bag to hold the parts and your gloves and helmet,
- 2 spare rear tires,
- a front tire,
- proper set of Allen wrenches,
- An air pump,
- a spoke wrench,
- sticky spray or pine tar to put on the push rims in damp or wet
conditions.
- a roll of white 1.5" or 2" sport tape,
- 4 or more safety pins, (for Bib)
- a towel,
- a rain parka,
- pliers,
- an extra set of glove liners (if you use them).
If you are really getting serious about track/road racing also consider; - an extra compensator,
- a toe-in/toe-out tool (for eagle chairs) , and
- an extra set of racing gloves.
- an extra front wheel so you don't have to change the tire just swap
wheels.
- a roller to practice indoors.
-
Compensator -
Always set the compensator first without the athlete in the chair. Set the straight, then place the chair in lane 2, 3, or 4 and set the curve. Most tracks have 2 radiuses in the curve, you can only set one. Set the beginning curve and it will be OK for the beginning and end of the curve. In the middle the athlete will have to steer or hip shift through the top of the curve. When finished ask the athlete to get into the chair to test the settings. They usually are 80-90% correct at this time. Each athlete is stronger on one side or the other. Most of the correction will be to correct for this issue so the athlete must push like they do in a race to be sure the settings are correct.
One more point. A novice chair user will not have the mussel to hold their head up when pushing. It will take time to strengthen this small mussel located between the top of the shoulder blades.
The compensator can be correct and the athlete will still be saying it is off. With the athlete in the chair push him/her (without the athlete pushing) and make sure the chair goes straight or properly on the curve. Then instruct the athlete to push, looking away from the chair at least 30 meters in front of them. Looking up should correct the problem once you have adjusted for the athletes push imbalances.
Finally it will take weeks if not a few months to learn to control the chair. It is more important that the athlete push looking up for the workouts than staying in their lane. After the mussel to hold their head up is developed and the athlete is comfortable pushing with a reasonable wheelchair push then start to coach lane management.